diy

Heels in the Perfect Colour

asos black heels

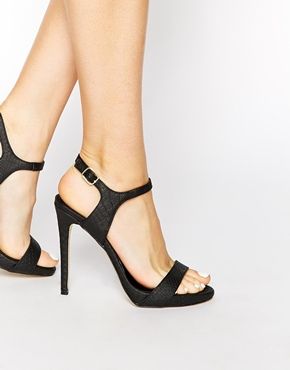
I got these shoes back in December and they are my all time favourite. They are the classic barely there, strappy heels in black -they go with everything and they are surprisingly comfortable. They are from Newlook and the reason I like these so much is most Barely There Heels have the single ankle strap which on me doesn’t give my foot enough support and my feet are always sliding around making it impossible to walk. These on the other hand are strappy and elegant but with the sling back design it holds my foot comfortably in place. Also as a side note -because the strap in just below the ankle it elongates the leg giving the appearance of longer legs which is a must for me. h10-(2)

So I love these heels and have been looking for something similar in a muted nude but I couldn’t find what I was after. Then when I was looking through the Newlook sale I found the same shoe in silver. I tried them on and they were just as comfortable as my black ones but I really wasn’t a fan of the metallic silver finish but they were reduced down to £8 for I brought them.

I decided to get all creative and paint over the silver with a nude nail polish. This technique would be great to up cycle an old pair of shoes you don’t like the colour of or to revamp some faded or scuffed shoes.  I know it sounds bananas to paint a pair of shoes with nail polish but it worked for me. I used Rimmel London Salon pro in shade 128 Mistify Me.

close up assortiment
Using the brush applicator I applied to a thin layer over all of the silver of the shoe. I let it dry and then applied another layer. I then went back in to any areas where the colour wasn’t even. It used up the whole of the bottle but I am so pleased with the end result. They have a gloss finish and the snake skin texture shows through which I really like and for £8 plus the cost of the polish which I already had I can’t complain.

IMG_5023

This slideshow requires JavaScript.

I’m not saying this is the best thing to do to a new pair of shoes but these were reduced down so I didn’t mind and they have turned out exactly how I wanted.
This technique won’t work on suede or other matte fabrics and it is always a good idea to test to see if the polish holds in a hidden part of the shoe before to go in and possibly destroy them, also I would suggest only applying a light colour on to a light shoe, if you paint a black pair of shoes with a cream nail polish the colour may come out looking different to how it does in the bottle.

This can be a great way to breathe some new life into some old heels or help you match a pair of shoes with your favourite bag or outfit but like I said it is always a good idea to test it out first.
Has anyone ever painted a pair of shoes you didn’t like the colour of? Leave me a comment bellow 🙂


The perfect trim at home.

Getting your hair cut professionally is always going to guarantee you a good hair cut but sometimes there’s no time to get to the hairdressers and when you just want a trim to loose those scruffy ends I can’t see the harm in doing it yourself. I have very long, brunette hair which comes to almost my waist at the back, my hair is extremely thick so I have a couple of layers put in to lift the weight and a few slightly sorter pieces around the front to frame my face. I like me hair to be easy to wear and style, I like not having to worry about my hair or what it is doing during that day. This may not be the best technique for you and your hair type but if your hair is long then I’d give this a go.

You should always cut your hair immediately after washing when it is still damp as this makes it easier to get a clean cut. First of all I separate out the top section of my hair (from just above my ears) and clip it in a bun on top of my head out of the way, leaving the bottom section down. I then divide the bottom section into two and bring all my hair round to the front. I brush through the lengths of the hair to ensure they are smooth. I then clamp my hair between my first two fingers and draw down to about an inch before the ends; using sharp scissors I cut about 2cm off the ends of my hair. Always cut parallel to the ends of the hair to keep it even and consistent. Do this on both sides until you are satisfied the hair is even. By bringing all your hair round to the front and cutting it straight across this will result in the back being slightly longer than the front this helps it fall more naturally and give it a slight V shape.

Next take down the bun and again brush through the hair. Divide the top section into two, the top back section (the crown) and the top front section. Take the back section and gather all the hair up vertically from the head. Again clamp the hair between the first and second finger and drag through to the ends maintaining the vertical of the hair. Again snip about 2cm off the ends of your hair. Let go of the hair and let it fall into place. Cutting it vertically gives your hair layers with out horrible staggered straight lines, this way will give it a feathered softer finish.

Repeat this with the front section. I like to ensure the front section is a little shorted than the back to give me the framing pieces around my face. Afterwards I let it fall again and ruffle it up to see how it looks. It’s good to gather the top section up vertically one more time to check the hair is even through out.

That’s it! It’s that simple. Cut away the dodgy edges from the bottom section of hair and then do the same with the top section but vertically from the head, cut to a straight line and let it fall.

Pinterest.

I just wanted to talk a little bit about Pinterest. Firstly i think its amazing and for those of you who don’t know what it is or just haven’t created an account -let me give you the low down. Pinterest is a web application where you can store, save and share images, links and inspiration that you find anywhere on the internet. When you come across an article you want to read again later or a recipe you want to try for dinner or even an image that shows exactly how you want your hair cut Pinterest allows you to keep all these clippings together. Before i would bookmark some pages or save images to my laptop with Pinterest everything is now all in one place.

Pinterest is essential a pin board for the web. Read something you want to see again- just stick a pin in it.
As well as being able to Pin the things you are interest in, you can follow friends and bloggers and view their boards as well. You can then repin things you like to your own boards.

katie's pinterest

Here’s a snapshot of my Fashion Board. See, so easy and clear; everything I view, like and love in one place. If your redoing your bathroom or your after DIY tips and tricks Pinterest is perfect. Say you are getting your hair cut so you turn to google for some photo inspiration but you know when the images are just a little bit naff and out dated and just not quite what you are looking for. I garentee search the same thing on Pintrest and the images will be exactly what you are looking for. 
If you want to follow me and see where I get my inspiration from feel free the link is below.
And why not create an account and start your own board. Happy Pinning.