beauty

The writing’s on the wall.

I think a space doesn’t feel yours or feel homely until you have stuff on the walls. This could be anything from photos to a painting or a piece of art it can really bring a room together. If you don’t own much furniture hanging a piece on the wall can help fill a space which would other wise be bare and impersonal. Adding something with colour can bring a theme together or lift a space will lots of dark furniture.  In my eyes a space isn’t mine until I’ve hung something on the wall. But if like me your renting and banging nails into a pristine wall isn’t an option don’t you worry I will show you some great ideas.

4185caWkOWL._SX522_ (2)
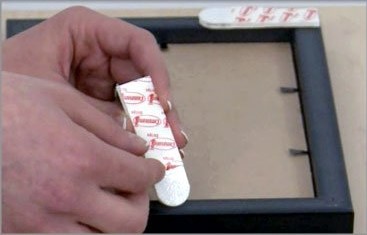
Command Brand Damage-free Hanging are an amazing damage free hanging system perfect for renters or anyone. Its an inexpensive sticky back velcro system. You stick them to the frame of a picture and stick them to the wall. You can then remove the picture easy and as many times as you like and put it back in exactly the same place by lining up the velcro and then to remove the strip completely from the wall you simply pull the sticky tab downwards and it comes straight off. It leaves no mark or residue on the wall and it’s the ideal system for hanging anything.

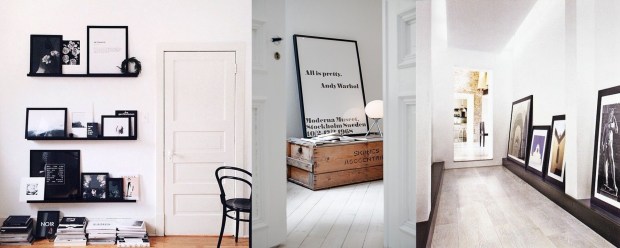
Another alternative is to rest frames against the wall either on the floor or on furniture or shelves. This creates a really minimal modern finish and it’s non damaging and a great way to display art.

display idea 1.jpg

Framed Quotes At the moment I am really loving framed quotes. I think they look super minimal, super classy and they are a great way to fill you mind with positivity and really make a space yours. I am in love with this piece I saw on Pintrest. It’s such a gorgeous print that would look so lovely in a hallway near the front door. 15250e2d6669d2d115c20f5a58182fcd

A framed quote is also a super easy DIY project you can do yourself. In word simply type out a quote, phase or anything you like. Chose a font and increase the font size until you are happy with the composition. Print and put in a frame. Homebase, B&Q, Matalan, Asda and more all sell cheap minimal frames that look great.

word x 36d2734eeafa9a02f162a07324b00142.jpg

Minimal Abstract Art When it comes to Art abstract is where I am drawn to. It’s the style I like to paint in myself and the types of pieces I like to have around me. Something that plays with texture and shape in a limited often muted palette. At the moment I absolutely adore dusty muted pinks and neutrals mixed in with blacks and whites.

abstract art.jpg

For more inspiration check out my Pintrest board.

What’s new to my makeup bag.

IMG_5283I wanted to share with you some new drug store products that have made it into my makeup bag. numbered

  1. Rimmel London Lasting Finish Primmer. £6.99. This primmer is nice and moisturising, it is a little on the thick side but it does provide a nice smooth base for your foundation and it also has a slight shimmer to it making it illuminating too.
  2. Maybelline Fit Me Concealer in shade Light. £5.99. This concealer is really creamy goings on really well and blends out nicely with out drying out your under eyes.
  3. Revolution Baked Highlighter in Peach. £3.00. This is so gorgeous, I also have the Golden Lights shade but picked up Peach for a more rosy highlight. It is very pigmented and finely milled. It applies really well with a large fluffy brush and is pink without being too much perfect for my fair olive skin tone.
  4. La Cross Premier crease shadow blending brush. £2.49. I got this brush on Ebay, it is such high quality, super soft and fluffy while dense enough to make blending your crease shadows so easy.
  5. Max Factor Excess Shimmer in copper. £7.99. This is a creme high pigment shadow, its called copper although I would describe it as a rosey champagne, it has such a nice shimmer looks gorgeous swept across the whole lid or as a highlight on the inner corner.
  6. Sleep Makeup Divine Eye Palette in Au Naturel. £7.99. This is my absolute palette at the moment. I wear them during the day or night there’s such a good range and I have used every colour. The champagne shimmer in the top right is my favourite as well as the mauve matte brown, shimmer khaki and the shimmer deep plum. So pigmented and creamy they blend really well, stay put through out the day and when the shimmers are used with a damp brush they literally make your look.
  7. Revolution Ultra Bronzer. £3.00. This is a huge pan for the price, and a great build able cool matte bronzer which works for subtly warming up the complexion through to a full on contour. Great bronzer for fair skin.
  8. Maybelline Push Up Drama Mascara. £7.99. Oh My God! this is literally the best mascara ever. If you like slightly clumpy full lashes then this is amazing. It goes on so quick and instantly wow! and it lasts all day, doesn’t crumble and is flexible and comfortable on your lashes.
  9. Bourjois Healthy Mix Foundation in shade Vanilla. £9.99. I have tried other foundations but I just keep coming back to this one. I love hydrated dewy makeup at the moment and this is exactly that, it has a medium to high coverage and applies so nicely. I have the shade Vanilla 52 mixed in with Light Beige 53 depending how much colour I want. I also find these foundations to have yellow undertones, perfect for my olive skin. Other light foundations I have tried have been too rosey.
  10. Olay BB cream in fair. £9.99. I picked this one up the other day from Superdrug where Olay was buy one get one free. I got their complete lightweight day fluid and also picked up this bb cream as it was free. It is so hydrating and moisturising with a subtle hint of coverage. I like to use it on its own or under my foundation when I want a little extra coverage and hydration.

So these were my latest additions to my makeup bag and this below, is my makeup bag. I got it for Christmas its from RiverIsland and is quite large but its a perfect size for my everyday makeup and its just so pretty in Nude and rose gold leather.

IMG_5297

I am loving a super highlighted, dewy completion with a mauve and dark dusty pink smoky eye at the moment. I think I am trying to get into the spring session even if the weather isn’t ready to yet.

All of the products are available in Superdrug online or in store.

I also got my nails done today and for the first time in ages I have gone for a deep dusty pink. It’s OPI You Sustain me. When your fair and have dark eyes its hard to wear pinky pinks as they just don’t go with your skin tone but I would defiantly recommend trying a cooler pink such as a mauve shade or one with a brown tone to it.

IMG_5293.JPG

The best of ASOS Lingerie.

When it comes to shopping online ASOS is always the first stop for me. They stock so many brands from big names to more affordable fashion but I have noticed recently their own brand lingerie and night wear has really picked up this season. Here are my top picks for right now. Affordable glamour and luxury.

asos lingerie

Lingerie needs to be delicate -lace and satin is always a winning combination. Multi straps create new lines and shapes which are so on trend right now. These are my top 5, from left to right we have:

ASOS Eyelash Lace Marylin Caged Underwire Bra £20 with ASOS Eyelash Lace Marylin CagedBrazilian Pant £10 this is a girly classic, the black set is an absolute staple and this eyelash lace half cup is such a pretty shape.

ASOS Rebecca Cross Front Longline Bra £18 paired with ASOS Rebecca strappy thong £8 is a stunning addition to your lingerie it’s a more unusual golden khaki colour which would compliment glowing skin.

ASOS Brandy Lace High Leg Body £20 this little lace piece is gorgeously delicate and easy to wear.

ASOS Lace Risky Business Strappy Triangle Bra £20 with ASOS Lacey Risky Business Strappy Thong £10 this set is so elegant, burgundy is a sophisticated red, it’s soft cup and strap detailing would add a little effortless beauty to a casual look.

ASOS Plunge Wrap Bow Side Teddy £25 is literally to die for, on the website it is paired with an over sided mottled grey cardigan for complete effortlessness. This is my absolutely favourite must have right now. Delicate burgundy satin trimmed with black lace in a wrap around tidied in a bow.The cut of the piece is so right showing enough but still comfortable. The fine straps continue the elegance to a T. I would love to wake up on a saturday morning feeling all elegant in this Teddy.

Image 4 of ASOS Plunge Wrap Bow Side TeddyImage 2 of ASOS Plunge Wrap Bow Side Teddy

Asos also have 20% student discount right now so go treat yourself.

http://www.asos.com/Women/Lingerie-Nightwear/Cat/pgecategory.aspx?cid=6046

Rimmel London Nudes.

I am a real fan of Kate Moss’s lip stick collection for Rimmel London. They come in such a great range of colours, they are really long lasting and costing only £4.99 from most dug stores -they are my go to lippy. Kate Moss recently brought out a new Nude Collection and again I was not disappointed.

This new collection features 5 gorgeous lipsticks in a range of beige shades, a clear lip conditioner and 5 nail polishes in an irresistible range of nudes. The collection is so on trend for this season and will see you through the summer and well into autumn/winter. For me it’s their lipsticks again that have caught my eye. I have purchased shades 43 and 48, 43 is a buttery caramel colour, it’s not far off my natural lip colour but just takes away the pink tone so it works really well against my olivey skin. 48 on the other hand is a rich dark beige almost chocolate, which would made a perfect nude against dark skin but for me it works as a chcocolately statement lipstick -I love it because it is still defiantly a beige shade and not a red or plum tone. There is a colour to compliment every skin tone and with its same long lasting finish as in Kate’s previous collections they will last. Perfect against your summery skin.

The perfect trim at home.

Getting your hair cut professionally is always going to guarantee you a good hair cut but sometimes there’s no time to get to the hairdressers and when you just want a trim to loose those scruffy ends I can’t see the harm in doing it yourself. I have very long, brunette hair which comes to almost my waist at the back, my hair is extremely thick so I have a couple of layers put in to lift the weight and a few slightly sorter pieces around the front to frame my face. I like me hair to be easy to wear and style, I like not having to worry about my hair or what it is doing during that day. This may not be the best technique for you and your hair type but if your hair is long then I’d give this a go.

You should always cut your hair immediately after washing when it is still damp as this makes it easier to get a clean cut. First of all I separate out the top section of my hair (from just above my ears) and clip it in a bun on top of my head out of the way, leaving the bottom section down. I then divide the bottom section into two and bring all my hair round to the front. I brush through the lengths of the hair to ensure they are smooth. I then clamp my hair between my first two fingers and draw down to about an inch before the ends; using sharp scissors I cut about 2cm off the ends of my hair. Always cut parallel to the ends of the hair to keep it even and consistent. Do this on both sides until you are satisfied the hair is even. By bringing all your hair round to the front and cutting it straight across this will result in the back being slightly longer than the front this helps it fall more naturally and give it a slight V shape.

Next take down the bun and again brush through the hair. Divide the top section into two, the top back section (the crown) and the top front section. Take the back section and gather all the hair up vertically from the head. Again clamp the hair between the first and second finger and drag through to the ends maintaining the vertical of the hair. Again snip about 2cm off the ends of your hair. Let go of the hair and let it fall into place. Cutting it vertically gives your hair layers with out horrible staggered straight lines, this way will give it a feathered softer finish.

Repeat this with the front section. I like to ensure the front section is a little shorted than the back to give me the framing pieces around my face. Afterwards I let it fall again and ruffle it up to see how it looks. It’s good to gather the top section up vertically one more time to check the hair is even through out.

That’s it! It’s that simple. Cut away the dodgy edges from the bottom section of hair and then do the same with the top section but vertically from the head, cut to a straight line and let it fall.

Complexion Perfection.

Everyone’s skin in different but I wanted to share with you how I like to achieve a glowing complexion. For me I believe it’s all about creating highlights and shadows with a slight dewiness to make your skin appear healthy and fresh. I like to start with Bourjois Radiance Reveal Healthy Mix foundation “for a healthy glow and flawless complexion” I apply this evenly and not to heavily across my whole face, this will act as a base for the other products so I like to keep it as light as possible whilst achieving full coverage, I also like to apply it with a medium foundation brush to ensure coverage. If you are in a hurry I like to pretty much leave it there as this foundation isn’t too masking your skin looks great just from this but for the true rich glow it’s time to contour and highlight.

So next I take Maybelline Fit Me concealer in Chestnut. it’s important to choose a concealer that is at least 3 shades darker than your skin tone because you are going to blend it into the natural shadows of your face to give it greater depth. So using the concealer draw a line following the hollow under your cheek bones and across your forehead close to your hair line and then using a beauty sponge blend it out, working the colour until it softens and blends into the foundation below. Subtly is the key.

Next you need to lift the highlights of your face; under your eyes, down your nose and into your T zone. For this I like to use a Light Foundation stick in the fairest shade. I draw a triangle under each eye and then a large T shape down my nose and up into my forehead. Then using my finger I like the blend and soften this colour into the foundation below. You have now created a complexion filled with highlights, mid tones and shadows that give structure to your face.

Finally I like to finish with Rimmel London’s Up and Glow highlighter, it’s a shimmer cream that sits perfectly when applied to the peak of the cheek bones and above the brow for that added glow.  I accompany my complexion with a lick of mascara and i’m ready to go for that fresh faced look.

Contouring can be extremely complex but I find this simplified technique works well and looks great for everyday makeup.

IMG_1421

Want to know how to keep that summer tan for longer, click here.

https://katielouisaclarke.wordpress.com/2015/07/27/glowing/

Want help finding the right foundation for your skin tone, click here.

https://katielouisaclarke.wordpress.com/2015/05/25/my-top-two-foundations/

Glowing.

Since getting back from holiday 2 weeks ago my tan is slowly fading but I’m determined to keep the glow for as long as possible.  The best thing you can do for your skin is keep it hydrated. Use a light weight body mosterisor so your skin stays plump but not caked in a greasy residue, I find it best to do this at night before bed so it has all night to seep in. Similarly your shower routine is very important I’m using Right Guard’s shower oil it’s rich in argon, almond and coconut oils -great for your skin and smells amazing. It’s good to buff your skin over with the palm of your hand as not to scrub your tan away.

And finally for finishing touches I use Body Shop’s bronzing dry oil on my arms and legs to add that extra glow especially now my natural colour is fading a little.


A post on the perfect glowing makeup to match your glowing tan is to come, so stay tuned! 😀

A good mani.

A girl with a good manicure projects confidence and professionalism. You can’t hide your hands, we use them for everything from greeting someone to simply scrolling through our phones.

I like to paint my nails just as much as the next girl but I was struggling to find the point. I would always choose a nice shade and it would look great for the first day but after a while and after I’ve washed up a few dishes and tidied the house twice my nails would always be left chipped and broken. I would then struggle to find time to redo them so they just continue to slowing chip away till I’m left with that horrible little patch of colour in the centre of each nail.

nude nails

I have just started a new job and shabby nails were not an option. First impressions matter even down to the colour of your fingers and toes. So I decided to get my nails done. I’ve never thought it was worth it before but now seemed as good a time as any to give it a go.

shades of nude

I had my nails shellacked. Basically its the same as painting your natural nails like you would at home, but the special formula sets like rock under UV light leaving your nails feeling super strong and so glossy. The brand I used was CND Shellac -they come is a huge array of colours. I am wearing Field Fox its a gorgeous dusky nude pink shade. If I wasn’t at work I would probably try a darker mauve colour, or a striking red or black. CND claims it will last chip free for 14 days, It’s currently day 4 and so far it looks as fresh as the day I had it done -Yay Sucsess! Hav a found a polish that actully lasts? I will keep you posted on how it looks on day 14 and whether I feel it is worth spending the little extra money on it.

For inspiration and my favourite shades check out my nails board on Pintrest.

Thanks for reading everybody. A follow up post is to come shortly. Have you had any experience with Shellac? leave your comments and views below. Lots of love 🙂 xx

The Beauty Blogger Award

I have something a little bit different for today’s post. I was very kindly nominated by the lovely Maymaysparkle for the Beauty Blogger Award. The award is open to any beauty blogger with less than 200 followers and I really appropriate the nomination.

My questions to answer:

  1. Why did you start blogging? I started my blog so I could keep a diary of everything that  catches my eye, it gives me a space to write my thoughts on everything current right now.
  2. If you could only use one makeup product for the rest of your life, what would it be? It would have to be by Maybeline Eye Brow Pencil -strong brows are everything. They frame your face and keep you looking neat and structured.
  3. Concealer or Foundation? Defiantly Foundation. I don’t really wear concealer, I always feel its a little bit too heavy.
  4. Blush or Bronzer? Always bronzer- For brunettes I always believe warm golden tones look better on the face so always bronzer for me to define the cheek bones and contour the face.
  5. Lip gloss or Lipstick? Lipstick 100%- I am really not a fan of the sticky feel of gloss. I love a nude lip stick or a matte plum lipstick for a bolder look. 
  6. Natural or color eye shadow? I would have to say dark neutrals. I love a rich brown smokey eye. 
  7. What is your favorite clothing brand? I like to shop around to keep my wardrobe varied, but I do love Zara, Mango, Topshop and H&M
  8. What is your favorite shoe brand? Again I love so many. Nike for trainers but anyone for all my other shoes.
  9. What is your favorite perfume? I love my Calvin Klein CK into U, but also love Dior. Light, fresh and sweet for me.
  10. What is our favorite beauty quote? “A smile is the best makeup any girl can wear” -Marilyn Monroe
  11. If you had a million dollars, what would you buy? A gorgeous London apartment and a frenchie and then I would give the rest to my family. 
  12. What are your hobbies? I absolutely love photography and design.
  13. What is your favorite nail polish brand? Essie
  14. Are you good at doing makeup? I’m getting there -I am always learning new tricks and trying things out.
  15. Who are your favorite Youtubers? I don’t watch that much youtube but I do love Lisa Eldridge -she has such a timeless look that’s so inspiring. 

My nominees are…

Lush Looks Make up Artist                  Sense                                   Fashion and Cars

Beauty                                                Angelwonder                         Kelly Erika

and Northern Nancy                           Blog Beautuoso                     Mane Interest

Questions for my Nominees:

  1. Mac or Nars?Christina Drejenstam nail polish
  2. Mac or windows?
  3. Whats the first thing you do in your makeup routine?
  4. What’s your favorite makeup remover and technique?
  5. 3 things you could never live without?
  6. Which product is always in your handbag?
  7. Who do you take inspiration from?
  8. Why did you start your blog?
  9. What event are you most looking forward to later on this year?
  10. Heels or Trainers?
  11. Nike or Adidas?
  12. Nudes or colours?
  13. Whats your favorite treat?
  14. What is your favorite food?
  15. Where do you see yourself in 10 years time?

Good luck to everyone and I look forward to reading your answers! Lots of love x

my top two foundations.

Finding the right foundation for your skin tone and type can be an absolute palaver. There are so many out there you have to consider whether you want a liquid or a mouse, light or full coverage, matte or dew finish and then you need to find the right colour- this is the part I struggled with for years.
foundation colour chart

Here are a couple of tips for finding the correct shade for your skin. Firstly decide what coverage you need, if you have dry or sensitive skin go for something light with natural ingredients also consider a dewy finish as this will be more moisturizing than a matte finish that could dry your skin out further. If you have “normal” skin then you have roam of what ever you like but I would recommend a light to medium coverage, anything too heavy with leave you looking caked and blotchy when it wears off.

foundation
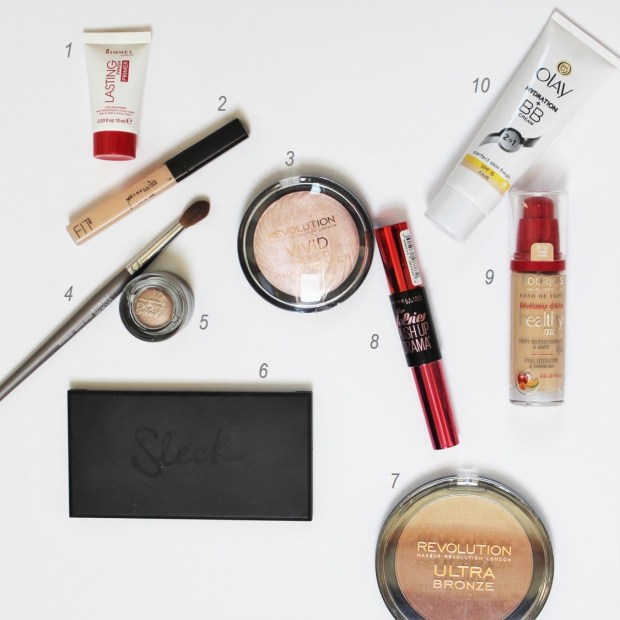
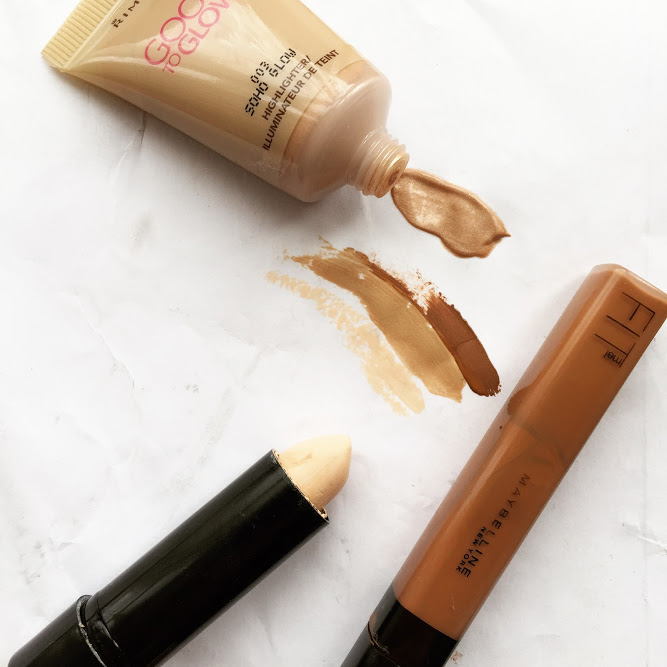
Picking the correct shade is the tricky part. When you go shopping for a new foundation I would say wear minimal to no make up so you can a clean base to work from. If you can I would recommend going somewhere like Selfridges or Debenhams or any department store where the staff are on hand and able to advise and test the products on your skin for you. If you are testing the foundation yourself then apply a small amount to the jaw line, this is the palest area of your face and if the foundation matches this area it will blend easily into your neck for a flawless finish.

I have fairly normal skin and prefer to wear a medium coverage matte foundation, my skin has a sandy beige under tone so I have found lots of foundations look too pink against my skin but now I have found my two favorites. Mac Studio Fix Fluid in shade NC15 and Revlon Colourstay in 180 sand beige. Both foundations have a similar consistency and apply really well to the skin with a foundation brush. Revlon Colourstay is a slightly deeper shade which is perfect for night or in the summer when I have a little more colour while Mac Studio Fix is the perfect shade for every day.

11271990_851685008242630_840584123_n
These foundations may not be the right ones for you but they are defiantly worth a look. Let me know what your favorite foundation is by leaving a comment bellow.

Mac Studio Fix Fluid £21.50 http://www.maccosmetics.co.uk/product/shaded/158/1231/Studio-Fix-Fluid-SPF-15/index.tmpl?77tadunit=fcb8c5d7&77tadvert=7634424279&77tkeyword=mac%20studio%20fix&77tentrytype=s&cm_mmc=google-_-search-_-brand-_-mac%20studio%20fix&gclid=Cj0KEQjwkIurBRDwoZfi1bGCxocBEiQAmcs-epnSWgx8bwa1z2Lt1-xExAw5Ln0IWG5LKOYe99B144QaAsy_8P8HAQ

Revlon Colourstay http://www.revlon.co.uk/Revlon-Home/Products/Face/Foundation/ColorStay-Makeup-with-SoftFlex-for-Combination-Oily-Skin.aspx